
Word Styles offer more than simply and consistently formatting text; they give you lots of power in organising your whole document.
For those new to using Styles, you might want to check out the introduction in my previous post: What are Word Styles and how do you use them? In the next few posts I’ll look at some of the most useful functions of Word Styles.
Here we’ll see how Word Styles can help you:
- navigate around the document
- organise document sections.
Contents
- Getting started
- Use Word Styles to navigate around your document
- Use Word Styles to restructure your document
- Summary
- What next?
Getting started
When I start editing a report, pretty much my first step is to make sure that the text is styled using Word Styles, especially the headings. If necessary – for example, if they’ve been manually formatted but are all still actually in Normal style – I’ll go through the report and apply Heading 1, Heading 2 etc. styles to them. (If you aren’t sure, check my post What Word style is your text formatted in?)
A note on user-defined heading styles
If you have defined your own heading styles, make sure that Word knows how they fit into the document heading hierarchy. Check the Outline level of your style in the Paragraph dialog box. As you can see below, the Outline level of the Subtitle style I have selected is Body Text, so the style won’t show up as a heading (which is fine, in this case).
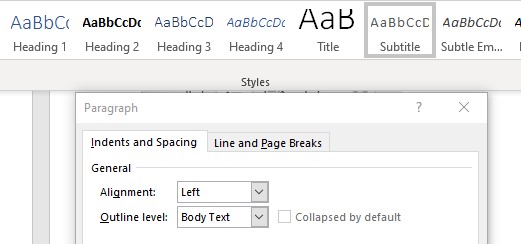
If you check the Paragraph dialog for Word’s built-in Heading 1 style, you’ll see it is set to Outline level ‘Level 1’, and Heading 2 is at Level 2 etc.
So if you have defined your own heading styles, make sure you set the Outline level of your styles so that Word can work with them as headings.
Use Word Styles to navigate around your document
I apply styles to the headings so that I can use the Navigation pane to get an overview of the structure of the document and move quickly to different sections.
Show the Navigation pane
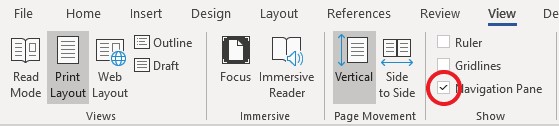
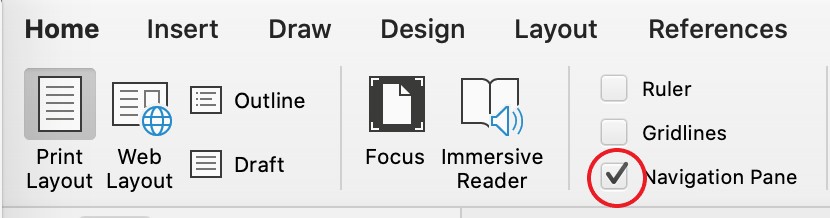
To use the Navigation pane, first make it visible.
In Word 365, go to the View ribbon and check Navigation Pane.
Here it is on my PC.
And here on my Mac.
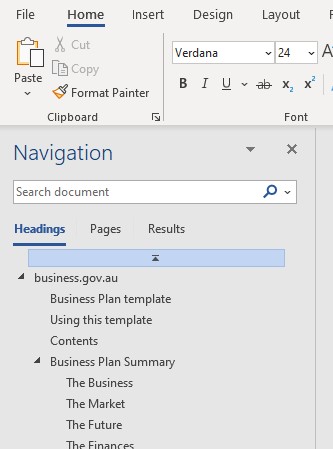
The Navigation pane sits on the left of the document window.
In Word on the PC, the Navigation pane has three tabs below a search field. The first tab, Headings, is what we want to look at.
On the Mac, the Navigation pane has four tabs, one of which (the magnifying glass) is a Find and Replace tab. The second tab, called the Document Map, shows headings.

See your headings at a glance
I find it very useful to be able to see all the headings at a glance, particularly when you are analysing the structure of the document. For example, at a glance you can see whether:
- the sections are in a logical order
- headings are at an appropriate level.
With your copyediting hat on, you can check whether:
- the headings use consistent style (e.g. capitalisation)
- the headings are parallel
- any numbered headings are in a proper sequence
- any text or blank lines are incorrectly formatted in heading style (e.g. in the image above, a blank line is formatted as a heading, labelled ‘a’).
Navigate around the document
Just as importantly, you can use this pane to move around the document. Clicking on a heading line will take you to that section – this is much quicker than scrolling, especially in a long document.
The Navigation pane also shows you where you are in a document. The section that your cursor is in will be highlighted. In the image above, the cursor is somewhere in the section titled The Market (labelled ‘b’).
Use Word Styles to restructure your document
You can rearrange document sections using Word Styles in two ways.
The Navigation pane, which we’ll look at first as we’re already looking at it, has some useful functions that seem to be restricted to the PC version of Word.
The second option, using the Outline view, applies to both the PC and Mac.
Reorganise in the Navigation pane (PC only)
Move sections of text
You can move a section of the document by clicking and dragging its heading in the Navigation pane up or down to a new place.
Adjust heading levels
The Navigation pane also offers various other ways to restructure your document. Right-click on a heading to see the possible actions.

For example, if a heading is at the wrong level (say at Level 2 rather than Level 1), you can right-click on the heading and choose Promote or Demote – the heading and any subheadings within that section will be moved up or down the heading hierarchy, as directed (and formatting adjusted to the style for the new level).
Format the Navigation pane
You can also add new headings and delete, select and print whole sections. The options at the bottom of the menu let you control how many heading levels are shown in the Navigation pane (this is also a feature on the Mac), and you can expand or collapse them all with one click.
Reorganise in Outline view
Set preferred view
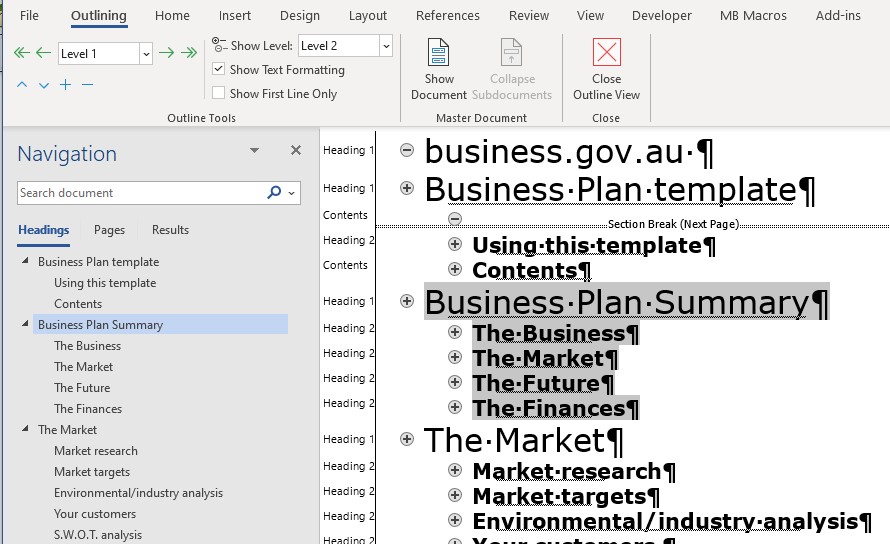
In Outline view (View > Outline) you can see the document just by the headings. In the image below, I’ve set ‘Show Level’ to Level 2. That will show headings from Level 2 up. You can choose Level 3, Level 4 etc. as appropriate (or even All Levels, but then it will show everything which defeats the purpose).
Note that the style names are shown in the Style Area pane (immediately to the left of the text). I discussed how you set this pane to show up in Draft view (which also applies to Outline view) in my post on determining your text style.
Move sections of text
You can move a section of the document by clicking and dragging its heading in Outline view up or down to a new place.
To do this, hover over the plus sign to the left of a heading and wait for the cursor to change into the four-headed arrow. Then click to select that section (you can see a section highlighted in the image above) and drag that section – the heading and all its subheadings – to a new place.
Alternatively, select one or more lines and click and drag the selection to a new position. If you select a heading without its subheadings, then just the selected part will be moved, so make sure you are moving the right text selection.
Adjust heading levels
In the screenshot above, the Business Plan Summary section is selected. As you can see at the top left, that is topped by a Level 1 heading. You can promote or demote a selection with the green left and right arrows. For example, if I click the right arrow, Business Plan Summary will go down one level become a Level 2 Heading and all the Level 2 headings in the section will become Level 3 headings (and so on).
You can select multiple lines in the Outline view and promote or demote those sections together with one click. That’s much faster than manually changing heading styles one by one.
Clicking the double left arrow will promote all text in the selection to Level 1 regardless of its original level (including non-heading styles), and clicking the double right arrow will demote all the text to Normal or Body Text (the bottom Outline level).
Summary
Word Styles help you get a great handle on the structure of your document, and let you quickly reorganise sections and heading hierarchies.
What next?
My next post will look at using Word Styles to create tables of contents and more.
See more tips and tricks. Tips on Word Styles are gathered in this collection.

Leave a comment